The pages that you wrote using prompts and write statements, while functional, left much to be desired in terms of user interaction. You had to include a separate prompt box for every input value, and, once users entered input, they could not review or edit previous entries. Event-driven form elements such as buttons, text boxes, and text areas enable you to develop simpler, more intuitive user interfaces . Using form elements, reimplement some of the pages you wrote in previous chapters to improve their ease of use.
EXERCISE 9.10: Reimplement your years.html page from Chapter 7 (EXERCISE 7.7) using buttons and text boxes. You should include a text box in which the user can enter a number of years and a button labeled "Convert to Seconds". When the user clicks the button, the number of years in the box should be converted to seconds and displayed in a separate box in the page. Remember to accompany each text box with a label that describes its purpose.
EXERCISE 9.11: Reimplement your pickem.html page from Chapter 7 (EXERCISE 7.8) using buttons and text boxes. Recall that this page tested a person's ESP by picking a random number between one and four, and then prompting the user to guess that number. For this exercise, modify the page to include four buttons labeled "1", "2", "3", and "4" in the page. The user should submit a guess by clicking the appropriate button. Once the user has guessed, JavaScript code should generate the random number and display it in a text box or text area.
EXERCISE 9.12: Modify your double.html page from this chapter (EXERCISE 9.5) so that it includes three additional buttons, labeled "Halve", "Increment", and "Decrement". When the "Halve" button is clicked, the number in the text box should be divided by 2. Similarly, the "Increment" button should add 1 to the value in the box, and "Decrement" should subtract 1 from the value.Note: The page should contain only one text box, and all four buttons should perform computations on the value in that box. You will probably want to define appropriate functions corresponding to the three new buttons.
EXERCISE 9.13: Write an interactive Web page named swap.html that contains two text boxes and a button. When the user clicks the button, the contents of the two text boxes should be swapped. The text boxes should appear on the same line, centered in the page, and the button should be centered below. Appropriate labels should accompany all elements.
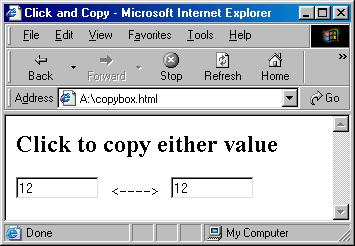
In most of this chapter's examples, users must trigger events by clicking a button. However, programmers can also define events to occur when a user changes the contents of a text box. The text box element's optional ONCHANGE attribute, which is similar to the ONCLICK attribute for buttons, specifies JavaScript code that executes when a user enters a new value in a text box and then clicks the mouse pointer outside the box. For example, the Web page in Figure 9.15 contains two text boxes, named box1 and box2. Each text box has an ONCHANGE attribute specifying that its contents are to be copied to the other box whenever a user alters the box's value. The effect is that the two boxes always mirror each other, no matter which is changed.
|
|
Figure 9.15: Web page that demonstrates the ONCHANGE attribute.

|
Figure 9.16: Appearance of the Web page from Figure 9.15.
EXERCISE 9.14: Enter the copybox.html text from Figure 9.9 into a new Web page, then load the page in the browser to verify that it behaves as described.
EXERCISE 9.15: Modify your convert.html page (EXERCISE 7.2) so that it no longer requires a button in order to convert temperatures. Each text box should have an ONCHANGE attribute specifying the action to be taken when a user inputs a number. When the user enters a number in the Fahrenheit box, that value should be accessed, converted to Celsius, and displayed in the Celsius box. Entering a number in the Celsius box should perform the opposite conversion. Thus, your new page should provide the same functionality as the old version, but should eliminate the need for a button to trigger the events.
EXERCISE 9.16: The supplemental material for Chapter 7 included an extension to the convert.html page that enabled various measurement conversions (e.g., inches <-> centimeters, feet <-> meters, and miles <-> kilometers). If you previously completed this extension, reimplement it using text boxes. Design the page so that it contains six text boxes on three lines; the text boxes representing inches and centimeters should appear on the first line, followed by feet and meters on the second, and miles and kilometers on the third. When a user enters a measurement in one box, the corresponding box should display that length in the other measurement system. For example, if the user enters 2 in the box labeled "inches: ", then 5.08 should automatically appear in the box labeled "centimeters: ". Likewise, entering 1 in the box labeled "kilometers: " should cause 0.6213712 to display in the box labeled "miles: ".
Another attribute associated with text boxes and text areas is the ONFOCUS attribute. Similar to the ONCLICK and ONCHANGE attributes, ONFOCUS specifies code that executes as soon as the user focuses attention on the text box or text area, either by clicking the mouse inside it or by using the tab key.
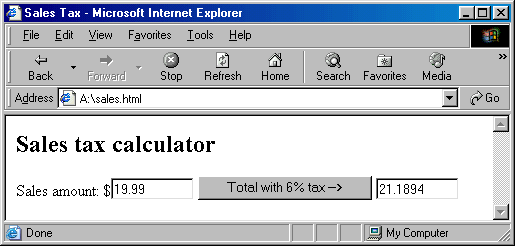
The ONFOCUS attribute is especially useful when you want to designate a text box or text area for output only. For example, suppose you wanted to create a Web page that computes sales tax on various transactions. The page could allow users to enter a sales amount into a text box, click a button, and view the total price including tax in another box. For security reasons, you would like to prohibit the user from modifying the contents of the total sale box-only the JavaScript code that computes the tax should be able to change the box's value. To prevent users from inputting values in the total sale box, you can associate an ONFOCUS attribute with the box. Any time a user clicks the text box, this event calls the predefined JavaScript function blur, which disables the user's ability to enter text in the box. The Web page in Figure 9.17 demonstrates the ONFOCUS attribute and the blur function.
|
|
Figure 9.17: Web page that demonstrates the ONFOCUS attribute.

|
Figure 9.18: Appearance of the Web page from Figure 9.17.
EXERCISE 9.17: Enter the sales.html text from Figure 9.17 into a new Web page, then load the page in the browser to verify that it behaves as described.Once you have done this, modify the page so that users can control the sales-taxed rate. First, add a text box to the page that accepts a tax rate as input. Then, define the TotalSale function so that, whenever a user clicks the button, JavaScript code accesses the rate box's value and uses it to compute the total sales amount.
EXERCISE 9.18: Modify your sales.html page so that fractional sales amounts are rounded up to the next cent. For example, the amount $21.1894 should be rounded up to $21.19. Using the following steps, you can round up a number so that only two digits appear to the right of the decimal place:Encapsulate this computation in a separate function, then redesign your page so that it uses this function to round up the total sales amount.
- Multiply the number by 100 (e.g., 21.1894 --> 2118.94).
- Round the value up using the Math.ceil function (e.g., 2118.94 --> 2119).
- Divide the number by 100 (e.g., 2119 --> 21.19).
|
|
Figure 9.19: Default alignment of text boxes with labels.
By placing the form elements in a table and designating one column for labels and another for text boxes, you can align the elements and improve their appearance (Figure 9.20).
|
|
Figure 9.20: Aligning the text boxes using a table.
EXERCISE 9.19: Modify your grade.html page (EXERCISE 9.4) so that the labels and text boxes for the student's grades align in columns. in columns.
EXERCISE 9.20: Modify your madlib.html page (EXERCISE 9.6) so that the labels and text boxes for the user's words align in columns.